

코더
Recaptcha 본문
개요 :
recaptcha 서비스를 브라우저에 간단하게 localhost:8080으로 호출을 하고 실제로 적용되나 테스트를 해보았다.
사용이유 :
사용자가 실제 사람인지, 아니면 악성 봇(매크로)인지 구분하여 보안을 강화하고 쾌적한 환경을 유지하기 위해 사용
장: 강력한 봇 차단, 무작위 대입 공격, 스팸 생성, 티켓 매크로 등 악성 봇의 접근을 효과적으로 차단합니다
단 : 사용자 경험(UX) 저하가 있고, V3 사용하는 현재는 괜찮지만 이미지 클릭을 하거나 ux가 저하 되고, 비용 문제가 발생 가능
설정 방법 :
1. Recaptcha 기본 설정
Recaptcha
https://www.google.com/recaptcha/admin/create?utm_source=chatgpt.com
로그인 - Google 계정
이메일 또는 휴대전화
accounts.google.com
label : 사용자가 원하는 이름 설정
V3 설정
도메인 추가 : localhost ( 테스트 목적 )

// 위와 같이 세팅을 완료하면 뜬다.
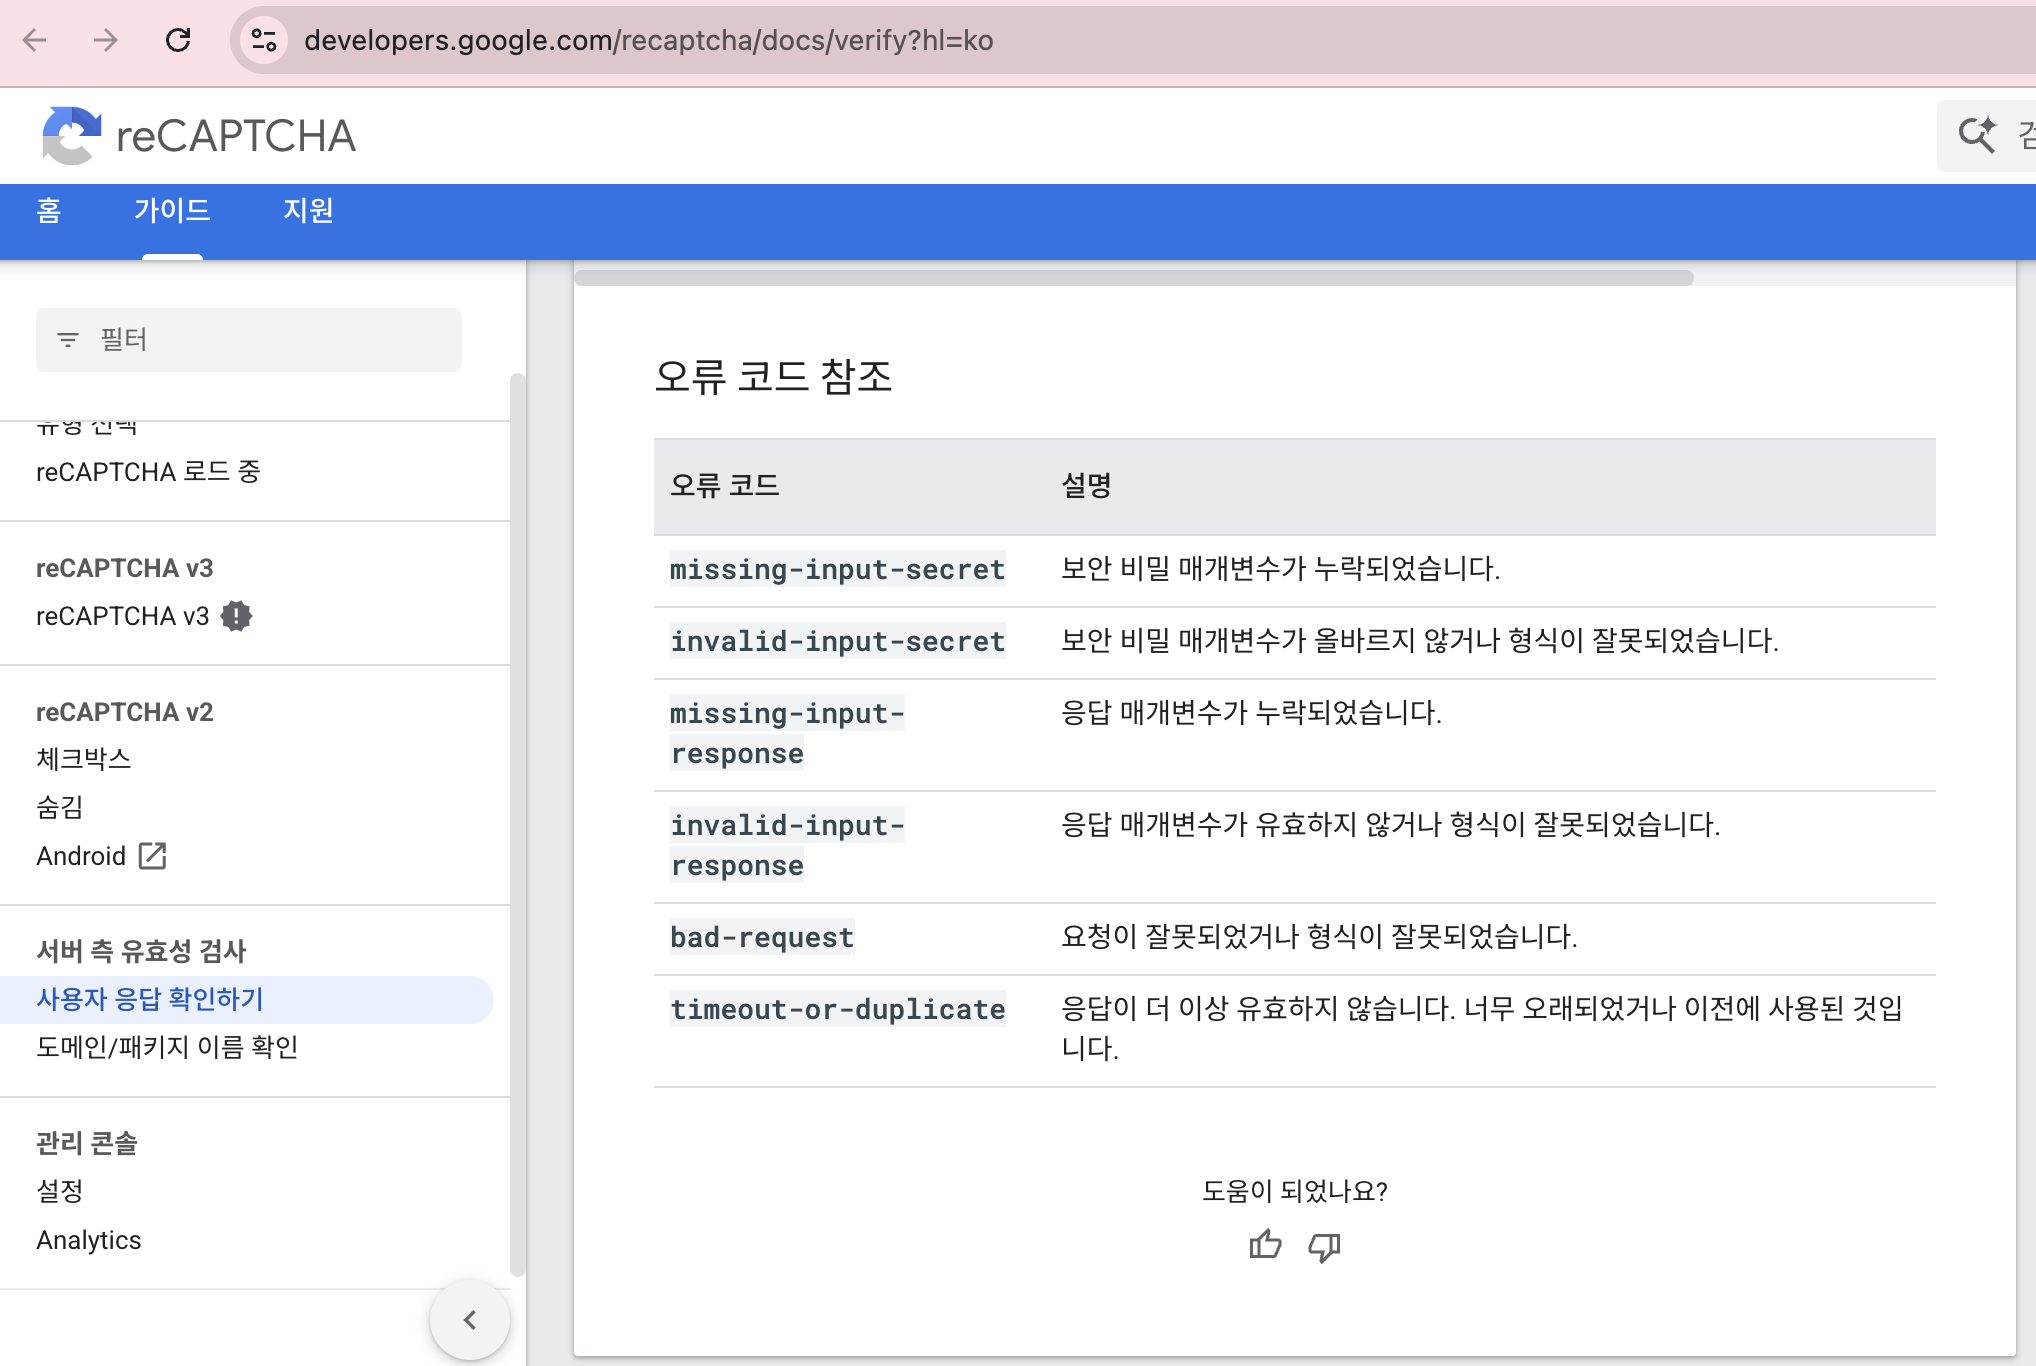
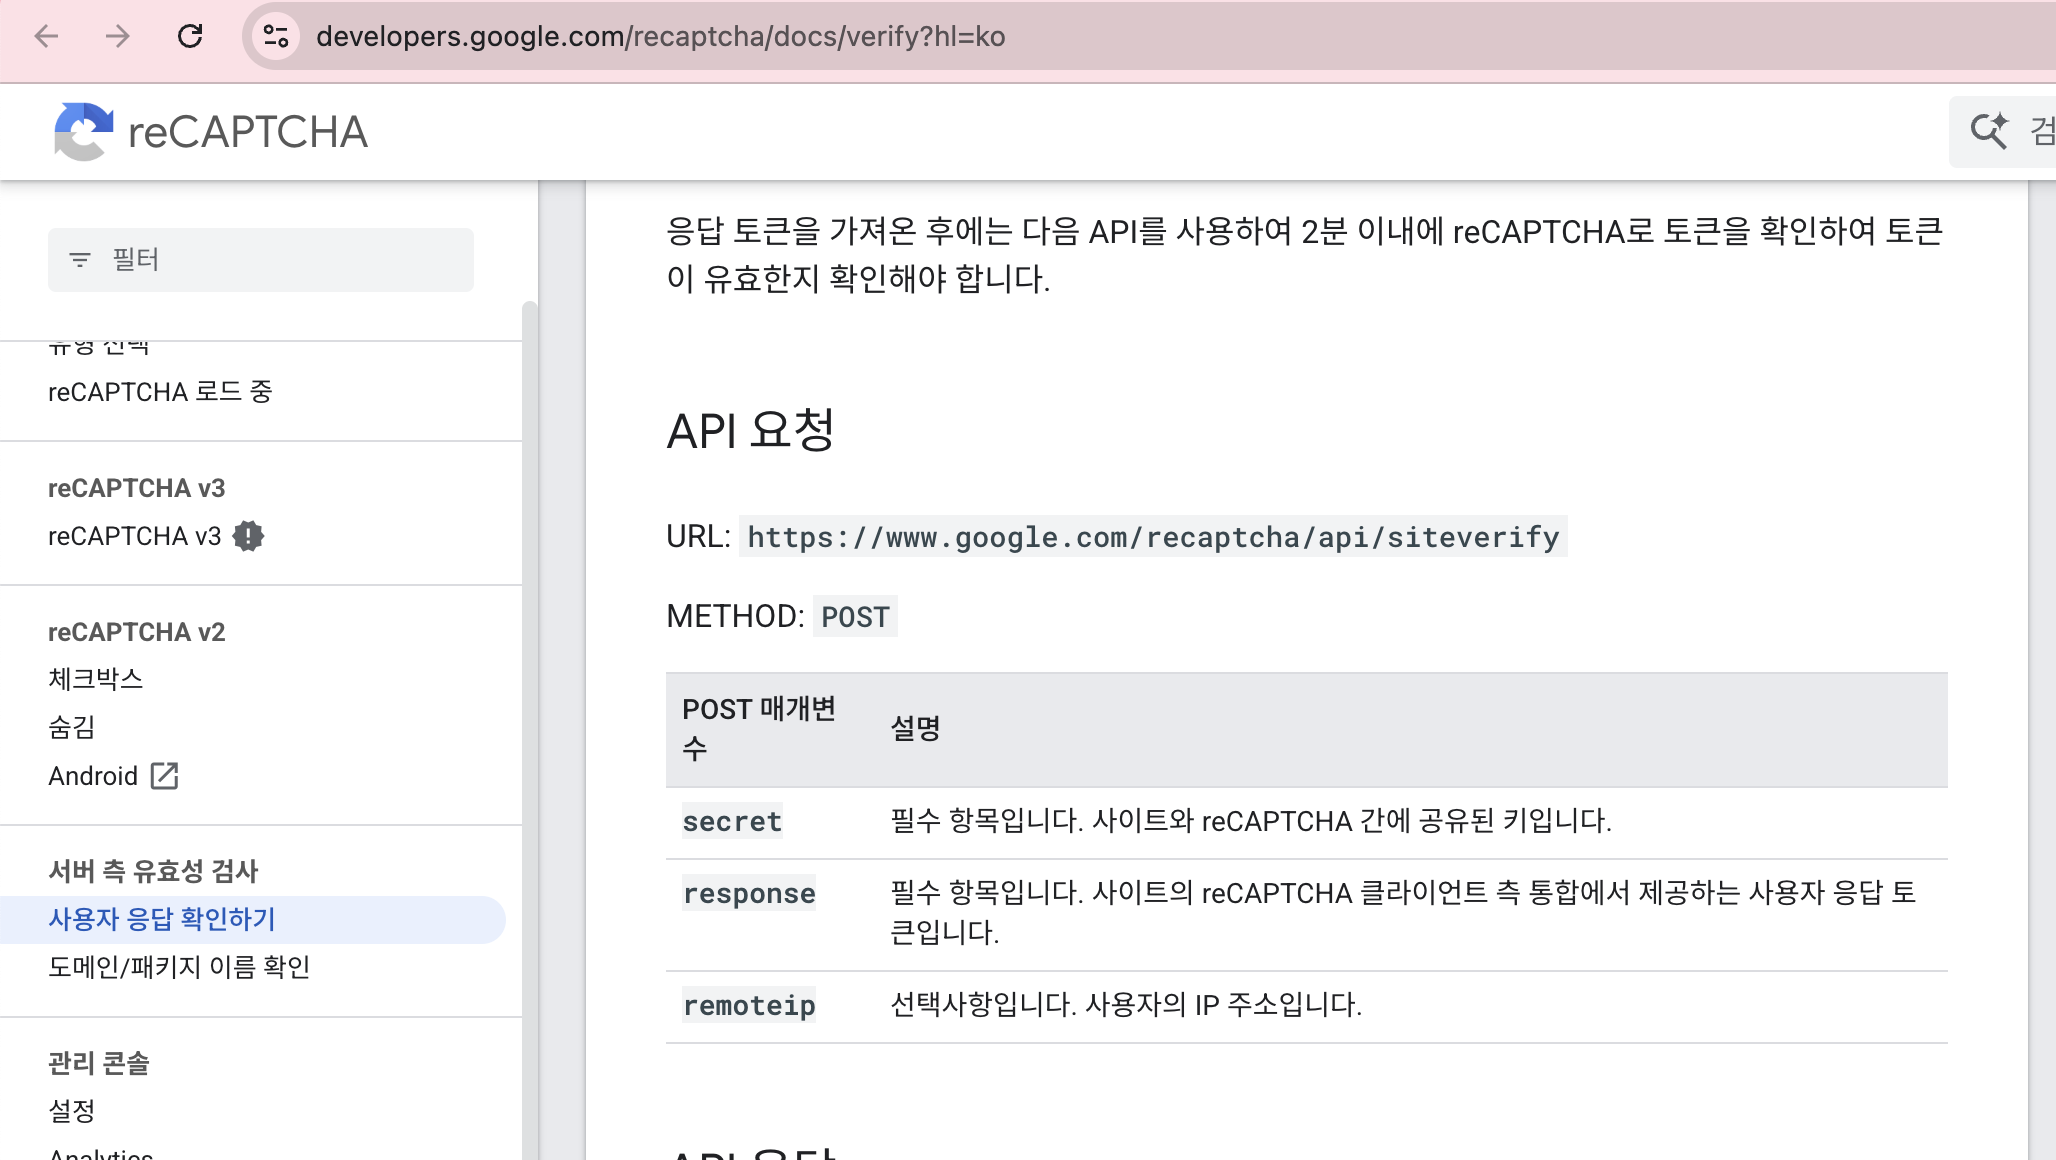
2. Recaptcha 오류 메시지 공식 기준
3. 코드 적용
<!DOCTYPE html>
<html lang="ko">
<head>
    <meta charset="UTF-8">

    <script src="https://www.google.com/recaptcha/api.js?render=6Lc3q-wsAAAAAF1MOum6Ue_gHP5Fd4OiTb1NDf0N"></script>
</head>
<body>

<h1>로그인 테스트</h1>

<form id="loginForm">

    <input type="text" id="email" placeholder="email">
    <input type="password" id="password" placeholder="password">

    <button type="submit">
        로그인
    </button>

</form>

<script>

    document.getElementById("loginForm")
        .addEventListener("submit", async function(e) {

            console.log("submit");

            e.preventDefault();

            const token = await grecaptcha.execute(
                '6Lc3q-wsAAAAAF1MOum6Ue_gHP5Fd4OiTb1NDf0N',
                {action: 'login'}
            );

            console.log("프론트 token =", token);

            const response = await fetch("/auth/login", {

                method: "POST",

                headers: {
                    "Content-Type": "application/json"
                },

                body: JSON.stringify({
                    userEmail: document.getElementById("email").value,
                    userPassword: document.getElementById("password").value,
                    recaptcha: token
                })
            });

            console.log(await response.text());
        });

</script>

</body>
</html>
// index.html 설정이다.
spring:
  application:
    name: test

  datasource:
    url: jdbc:mysql://localhost:3308/testdb
    username: root
    password: root

  jpa:
    hibernate:
      ddl-auto: update
    #
jwt:
  secret : siuiamronaldo

recaptcha:
  secret-key : 이건 알려주기 싫소이다.
// application.yml 설정
@Getter
@Setter
@JsonIgnoreProperties(ignoreUnknown = true) // dto에 없는 json 필드는 무시
public class RecaptchaResponse {

    private boolean success;

    private double score;

    private String action;

    @JsonProperty("error-codes") // errorCodes 매핑
    private List<String> errorCodes;
}
public AuthResponseDto login(AuthRequestDto authRequestDto) {

        System.out.println(authRequestDto.getRecaptcha());
        boolean verified = recaptchaService.verify(authRequestDto.getRecaptcha());

        if(!verified) {
            throw new RuntimeException(" recaptcha 로직 검증 실패 ");
        }

        User user = loginRepository.findByUserEmail(authRequestDto.getUserEmail())
                .orElseThrow(()-> new RuntimeException("유저없음"));

        if (!PasswordEncoder.matches(authRequestDto.getUserPassword(), user.getUserPassword())) {
            throw new RuntimeException("LOGIN_FAILED");
        }

        String accessToken = tokenService.createAccessToken(user.getId(), user.getUserRole());

        Cookie cookie = new Cookie("accessToken", accessToken);

        cookie.setPath("/");
        cookie.setMaxAge(3600);
        cookie.setHttpOnly(true);
        cookie.setSecure(false);

        return new AuthResponseDto(user.getUserEmail(), accessToken, cookie);
    }
}
// 로그인 설정에 추가한 모습이다.
package com.example.test.recaptcha;

import org.springframework.beans.factory.annotation.Value;
import org.springframework.stereotype.Service;
import org.springframework.util.LinkedMultiValueMap;
import org.springframework.util.MultiValueMap;
import org.springframework.web.client.RestTemplate;

@Service
public class RecaptchaService {

    @Value("${recaptcha.secret-key}")
    private String secretKey;

    private final RestTemplate restTemplate = new RestTemplate();

    public boolean verify(String token) {

        String url =
                "https://www.google.com/recaptcha/api/siteverify";

        MultiValueMap<String, String> body =
                new LinkedMultiValueMap<>();

        body.add("secret", secretKey);
        body.add("response", token);

        RecaptchaResponse response =
                restTemplate.postForObject(
                        url,
                        body,
                        RecaptchaResponse.class
                );

        if (response == null) {
            return false;
        }

        return response.isSuccess()
                && response.getScore() >= 0.5
                && "login".equals(response.getAction());
    }
}
// RecaptchaService 코드
@Controller
public class PageController {

    @GetMapping("/")
    public String index() {
        return "index";
    }
}
// 간단하게 브라우저 호출을 위해서 / 경로를 하나 추가했다. 여기에서 @Controller 이기 때문에 index.html 호출한다.
@Configuration
@EnableWebSecurity
@RequiredArgsConstructor
public class SecurityConfig {

    private final JwtAuthenticationFilter jwtAuthenticationFilter;

    @Bean
    public SecurityFilterChain securityFilterChain(HttpSecurity http) throws Exception { // HttpSecurity 설정 중 예외 가능성을 선언한 것
        return http
                .csrf(csrf -> csrf.disable()) // Session을 쓰지 않는 구조에서는 CSRF 토큰이 필요 없으므로 꺼줍
                .sessionManagement(session ->
                        session.sessionCreationPolicy(SessionCreationPolicy.STATELESS) // 매 요청마다 JWT로 인증처리하니 서버는 로그인 상태 기억하지 않음
                )
                .formLogin(login -> login.disable()) // 기본 제공되는 form 기반 로그인 화면을 사용하지 않겠다
                .authorizeHttpRequests(auth -> auth // spring이 준 auth 설정 객첼 "/api/**" 경로에 인증 설정한다 즉, x -> x이런식이어도 상관없다
                                .requestMatchers("/","/auth/signup", "/auth/login","/auth/refresh").permitAll()
                                .requestMatchers("/owner/**").hasRole("OWNER") // "ROLE_CUSTOMER" 권한을 갖고 있어야 함
                                .requestMatchers("/customer/**").hasRole("CUSTOMER") // "ROLE_CUSTOMER" 권한을 갖고 있어야 함
                                //.requestMatchers("/favicon.ico").permitAll()
//                                .requestMatchers(HttpMethod.POST, "/owner/**").hasRole("OWNER")
//                                .requestMatchers(HttpMethod.GET, "/owner/**").hasRole("OWNER")
//                                .requestMatchers(HttpMethod.DELETE, "/owner/**").hasRole("OWNER")
//                                .requestMatchers(HttpMethod.PUT, "/owner/**").hasRole("OWNER")
                                .anyRequest().authenticated()
                )
                .addFilterBefore(jwtAuthenticationFilter, UsernamePasswordAuthenticationFilter.class)

                /*  Spring Security 필터 체인에서의 순서 예시
                  SecurityContextPersistenceFilter
          ↓
                  jwtAuthenticationFilter   ← 커스텀 JWT 필터 (사용자 인증 정보를 SecurityContext에 세팅)
          ↓
                  UsernamePasswordAuthenticationFilter   ← 여기선 꺼둠(formLogin().disable())
          ↓
                  FilterSecurityInterceptor

                  즉,
                  UsernamePasswordAuthenticationFilter는 기본 로그인 처리 필터이다.

                  JWT 인증에 UsernamePasswordAuthenticationFilter가 필수인 건 아니다.
                    그 필터 대신 JWT 필터를 직접 사용하는 구조다.
          */
                .build();
    }
// 당연하게 토큰을 아직 검증을 안해주었으니
.requestMatchers("/","/auth/signup", "/auth/login","/auth/refresh").permitAll()
// 위에 값을 추가했다.
발생한 문제점 :
1. "/" 를 추가를 안해주어 경로가 열리지 않았다.
2. postman에서 recaptcha에 해당하는 키값을 넣어줬는데도 동작을 안했다.
errors = null 이 뜬 후
errors = [timeout-or-duplicate] 와 같은 오류가 찍혔는데
생각해보니 한번 이미 구글에서 검증이 끝난값이기 때문에 postman에서 login을 시도 했을 시 오류가 나는것이었다.
결과 :

참조 : 구글 공식 문서
보안 및 아쉬운 점 : Recaptcha 서비스는 회원 가입 할 때 부터 적용하는게 맞다고 생각을 했다. // 추후 수정예정
또한 postman에서 검증하기에는 적합하지 않았다 느껴져 아쉬웠다. (브라우저에서 테스트 해봐서 문제는 없을것이다.)